blogshop.

Blogging two days in a row?  I am back in action people.  And so excited to share everthing that I've been working on during my blog hiatus.  So, here's a fun project I worked on a bit ago.  I created the decor for Blogshop in San Francisco, alongside Danielle's beautiful florals.  Bri is so creative, so it was amazing to make some fun decor for her class.  I created some "florals to go" boxes that truly became one of my favorite projects ever.  Danielle made the most beautiful arragements and I felt that at the end of day, they should go home with each blogshop student...thus the "to go" boxes.  I also made some fun gold leaf head wraps for each student to wear. {Stay tuned, as I plan on making more that will be up for sale in the future.}  I adorned the front entrance with gold-leafed feathers.  And lastly, I designed a big backdrop for photos, which Danielle adorned with the most gorgeous blooms.  Truly one of my fave projects that I've worked on to date. 

{photos by Angela Kohler, with exception of feather photo} {feather photo by @ericamariemarr}

tree stumps.

I love wood elements in a home and what better way to incorporate this idea, then with actual tree stumps.  I mean, what a great diy.  I love the stumps spray painted in gold, or maybe just a touch of color on the top.  What do you think?  Is this something you would try?

{birch}, {gold}

diy.

I've been meaning to share these photos for awhile now, but it slipped my mind.  oppps!  So, finally, here are some close ups of a few of the diy projects I made for the Enjoy Events workshop.  Making the concrete vases was crazy easy.  I just followed this step-by-step video (and added a coat of gold spray paint to the top).  The hardest part was figuring out how to carry the massive bag of concrete mix from my car up to our apartment.  Note to self, do not buy heavy items from Home Depot when your husband is outta town for work. 

The gold feathers were a little departure from my normal "add gold spray paint to everything" routine.  I bought a gold leafing kit and simply applied it to the tops of the feathers.  I love how much shinier the leafing looks compared to the spray paint I usually use. 

And lastly the geode bottle stoppers.  I found this great shop in the city that sells the geodes for $0.99 and bought some cheap corks from Target (but you can use an old wine bottle cork you have laying around too).  Then I simply super glued them together.  So so so easy and I think they make the cutest gifts.

diy denim.

I'm so excited so to share this diy I put together on how to transform a pair of your old jeans.  Check out my guest post over on the pocket stylist today to see all the deets on how to create this fun napkin.

diy tablecloth.

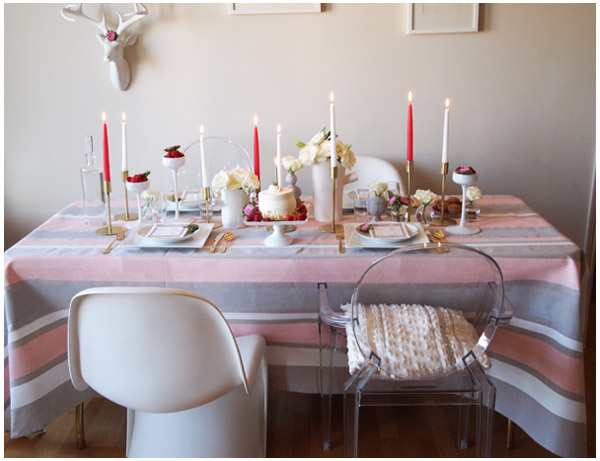
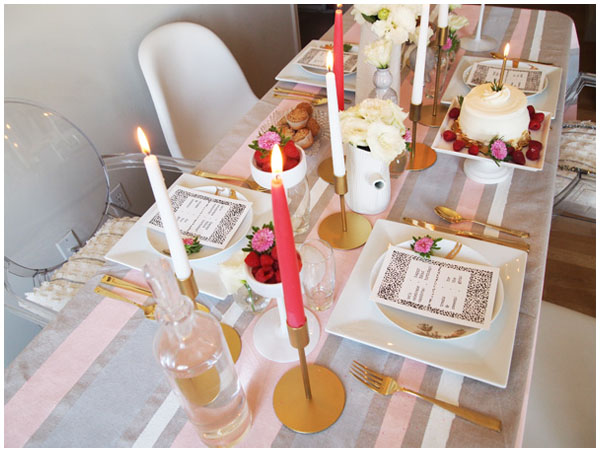
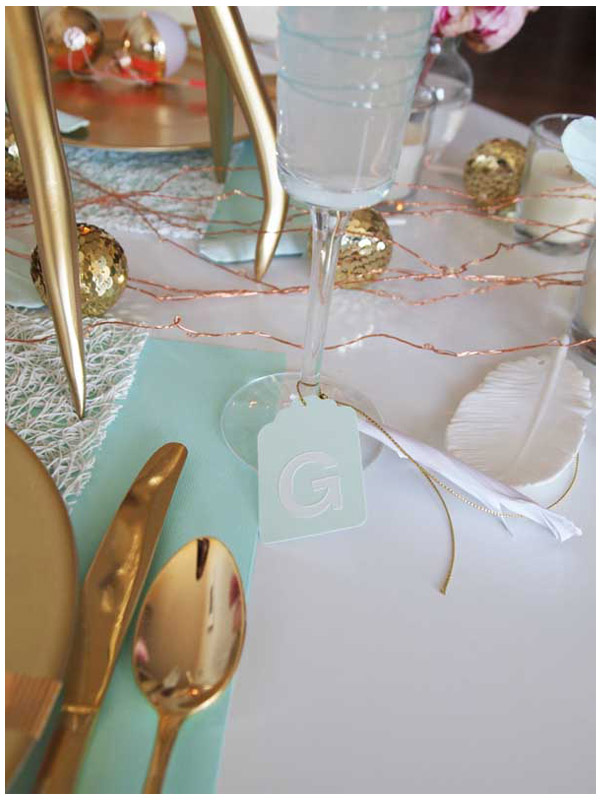
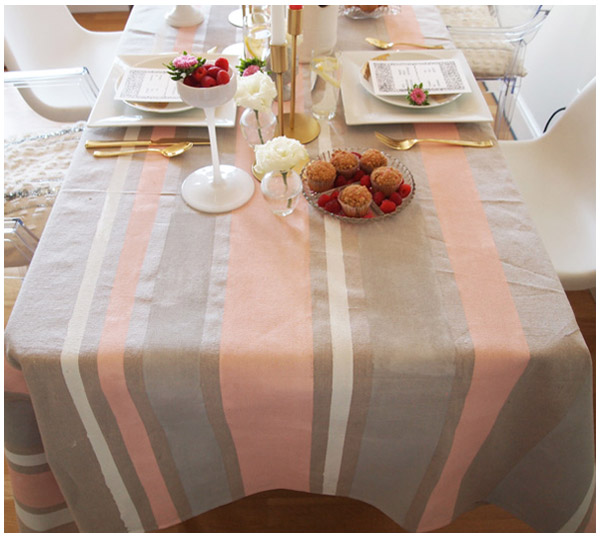
I hope you guys all enjoyed checking out the tabletop I put together over on Alison Events yesterday.  So today I wanted to share with you how I made that tablecloth.  I spotted this tablecloth on Anthropologie's site and instantly fell in love, but not with that $228 price tag.  So I used it as inspiration to create my own.  

supplies:

-1 canvas drop cloth (I bought mine at Home Depot for $24).  The size is up to you, but I wanted one that covered an 8' table, so I bought one that was 9' x 12' and then cut it down to size.

-paint.  I used regular old interior house paint from Home Depot.

-a small roller, paint brush, paint containers, a plastic drop cloth (larger size then your canvas drop cloth), blue painters tape.

what to do:

-The ideal location to paint your drop cloth would be a garage or outdoor space, but if you live in a small space like I do, you can still make it work.  First I cut the drop cloth down to the desired size (I literally placed it over the 8' table I wanted to use it on, decided how much I wanted it to drape, then cut).  I put a large plastic drop cloth down first to protect our hardwood floors.  Then I put the cloth drop cloth down and taped it down so it wouldn't shift around.  Also, I opened up all of my windows to make sure I had plenty of circulation.

-Next step is to tape off your drop cloth.  If you want to be precise you can use a ruler, but I wanted the finish product to look a bit random so I just eye balled the taping.  I just readjusted things as I placed the tape until I liked the look.  I also wanted the sizes of the stripes to be very random so I made sure the stripes were all slightly different sizes.

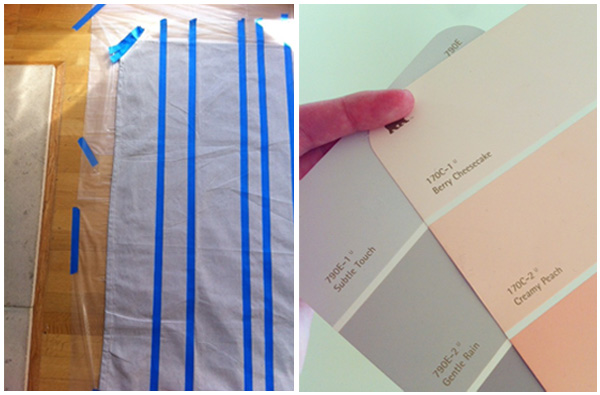
-Once everything is taped off (which by the way, this was the longest step in the process) then it's time to paint.  I chose three different colors (behr creamy peach, behr gentle rain & white).  Before painting I chose which stripe would be which color (again I didn't want two of the same colored stripes to be right next to one another, so by choosing in advance, I made sure that the final product was random looking).

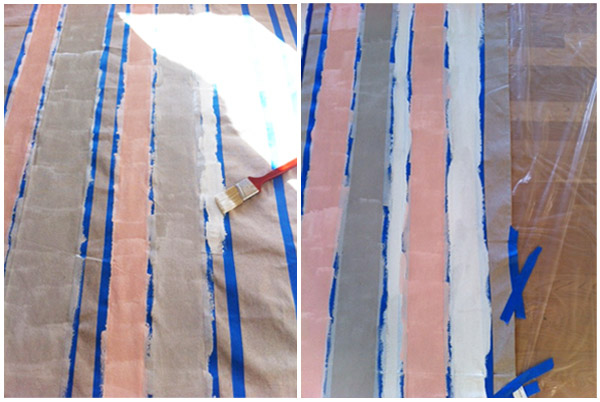
-Let the drop cloth dry (I let mine dry overnight).  Once it's dry, remove the painters tape and it's ready to be used.  YAY!  Hope you enjoyed this little diy project.  Super simple, yet it creates a big impact.

a valentine's diy.

Happy Valentine's Day.  Like I mentioned yesterday, my husband and I don't really celebrate the holiday, but this year I decided to make some fun valentines.  I created a few cards and a few canvas bags filled with candy.  I wanted to share how to create these little bags.  It's super easy to do at home.

supplies:

canvas bags (I bought mine here in bulk, but you can get them at Michaels or Paper Source), ink jet tshirt transfer paper, a printer, iron, towel, candy.

what to do:

1. I started by making a simple design in adobe illustrator.  You can also make something on word it you don't have illustrator.  

2. After you have finished the image, you need to mirror the image.  (varies slightly from program, but you will need to rotate the image by flipping it horizontally so that it is backwards).

3. Print out the image on the transfer paper, then cut down to size.

4. Put down a towel, then place the image down where you want it on the canvas bag, image side down.  

5. Iron the image on the bag (I also put a small piece of cardboard into the canvas bag just so the front and back of the bag were well separated).  Wait for it to cool down, then pull the backing off of the transfer paper.

6. Add candy and give to your valentine.

xoxo!

holidays.

So excited to finally share some pics with all of you of our holiday decor.  I hinted about our minty holiday here, and now it's time to reveal the final product.  I did some super simple diy projects on this one.  I dip-dyed some ornaments and feathers.  It's really the easiest thing on the planet.  I literally just dipped them into a paint can then taped them to fishing line to dry.  done and done!  I chose a color palette of mint, gold and white as the base...and threw in a bit of lilac and pink for a pop.  I hope you enjoy this fun holiday decor!  Wishing you all a very happy holiday from our family to yours.  xoxo!


pumpkins.

October is here, hooray!  I love love love fall and winter time.  Like, I really can't get enough.  The change in seasons means the holidays are upon us, yipppeeeee!  The holidays mean spending time with family and really does it get any better then that?  No it doesn't.  Our neighbors have already begun placing their pumpkins outside of their doors and I'm ready to start painting.  Are you kidding me with the below beauties?  I'm totally obsesssed.

{white dotted}, {gold stripe}, {blue dotted}, {hot pink}, {vase}, {gold numbers}, {gold plate}

chair leg love.

I am smitten with the dip dyed legs of these chairs.  Such a simple diy, that adds a big punch to an otherwise simple wood chair.  Perhaps I need to hit up some garage sales over the weekend to find some chairs in need of a little tlc.

{single chair}, {chairs}

feathery diy.

I wasn't kidding when I said that I love feathers.  I spotted Rachel Bilson on this magazine cover over a year ago and I was obsessed.  When I first saw it I thought that was a chunky chain necklace with feathers attached, but now when giving it a fresh glance I think those feathers are actually a part of her dress.  Well, whatever the case, I loved the look and was determined to make it mine.  I searched high and low for something similar and when I came up with nothing, I decided that I could make something just as unique.  I swear that this was the easiest DIY project ever.  I purchased a necklace at Loehmann's for $15, bought some ostrich feathers, and used a hot glue gun to attach them to the back of the necklace.  Done and done.  In total, the project probably took me about 5 minutes to complete and yet I feel like I achieved just the look I was aiming for.

{magazine}, {gg photos by caroline}, {my pic}